4 nail trends to try in 2024 

Don't know what manicure to ask for during your first nail appointment of the year? this is top 4  nail trends to try in 2024

The term "aura nails" typically refers to a type of nail design that features a gradient or ombre effect resembling the colors of an aura. This style often incorporates soft transitions between colors, creating a dreamy and ethereal look on the nails. If you're interested in achieving gradient or aura nails, here's a general guide on how to create this effect:

1 Gradient 'Aura' Nails Tutorial:

Materials:

.Base coat

.Two or more nail polish colors of your choice

.Makeup sponge

.Clear top coat

Steps:

Prepare Your Nails:

Start with clean, trimmed nails. Apply a base coat to protect your natural nails and improve the longevity of the polish.

Choose Your Colors:

Select two or more nail polish colors that complement each other and will create a beautiful gradient effect.

Apply Base Color:

Apply a solid base color to all your nails and allow it to dry completely.

Prepare the Makeup Sponge:

Cut a small piece of a makeup sponge. The sponge will be used to create the gradient effect.

Apply Nail Polish to Sponge:

Apply lines of each chosen nail polish color next to each other on the makeup sponge. Ensure that the colors slightly overlap.

Dab Sponge onto Nails:

Gently press the sponge onto your nail, rolling it slightly to blend the colors. You may need to repeat this step a few times to build up the intensity of the gradient.

Clean Up Edges:

Use a small brush or a cotton swab dipped in nail polish remover to clean up any polish that may have gotten on your skin or cuticles.

Apply Top Coat:

Once you're satisfied with the gradient effect and the polish is dry, apply a clear top coat to seal and protect the design.


2 Metallic Nail Art:

Materials:

Base coat

Metallic nail polish or chrome powder

Sponge applicator (for chrome powder)

UV or LED lamp (for gel-based metallic nails)

Clear top coat

Steps:

Prepare Your Nails:

Start with clean and trimmed nails. Apply a base coat to protect your natural nails.

Apply Metallic Nail Polish:

Apply a metallic nail polish of your choice. For a more intense metallic effect, you can use chrome powder.

Use Chrome Powder (Optional):

If using chrome powder, apply it with a sponge applicator onto the nails while the polish is still tacky. Buff the powder for a shiny, metallic finish.

Cure Under UV/LED Lamp (If Using Gel):

If using a gel-based metallic polish, cure the nails under a UV or LED lamp according to the product's instructions.

Apply Clear Top Coat:

Seal the metallic design with a clear top coat to enhance shine and durability.


If you want to go crazy for "glazed" pastels on your nails, you're in for a trendy and fun manicure. Glazed pastels often refer to soft, muted pastel shades that have a glossy or shiny finish. Here's a guide on how to achieve this look:

 3 Glazed Pastel Nails Tutorial:

Materials:

Base coat

Pastel-colored nail polishes (choose a range of colors)

Clear glossy top coat

Nail art tools (optional)

Steps:

Prepare Your Nails:

Start with clean, trimmed nails. Apply a base coat to protect your natural nails.

Choose Pastel Colors:

Select a range of pastel-colored nail polishes. You can choose shades like mint green, baby blue, lavender, soft pink, or any other pastel hue you love.

Apply Base Color:

Apply one of the pastel colors as a base coat on your nails. Let it dry completely.

Layer Pastel Colors:

Apply additional pastel colors on top of the base color. You can use a different color on each nail or create a gradient effect by applying multiple colors on a single nail. Allow each layer to dry before adding the next.

Add Nail Art (Optional):

Get creative by adding nail art elements like tiny flowers, dots, or geometric patterns using contrasting pastel colors. You can use nail art tools or even toothpicks to create simple designs.

Apply Clear Glossy Top Coat:

Once your pastel colors are dry and you're satisfied with the design, apply a clear glossy top coat. This will give your nails that "glazed" or shiny finish.

Cleanup Edges:

Use a small brush or a cotton swab dipped in nail polish remover to clean up any polish that may have gotten on your skin or cuticles.

Final Touch:

After the top coat has dried, moisturize your cuticles and hands for a polished look.


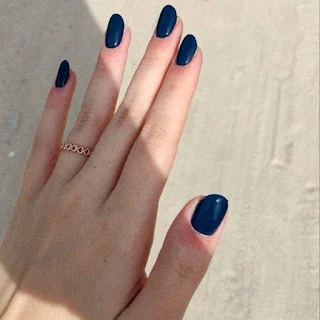
4 Denim Blue Nails:

Materials:

Base coat

Denim blue nail polish

Silver or white nail polish (for accent if desired)

Clear glossy top coat

Steps:

Prepare Your Nails:

Start with clean, trimmed nails. Apply a base coat to protect your natural nails.

Apply Denim Blue Nail Polish:

Apply a coat of denim blue nail polish on each nail. Allow it to dry completely.

Add Additional Coats (Optional):

If needed, apply a second coat of denim blue nail polish for a richer color. Allow each coat to dry.

Create Accent (Optional):

If you want to add a bit of flair, consider creating an accent nail using silver or white nail polish. You can apply it in a geometric pattern, as dots, or as a French tip.

Apply Clear Glossy Top Coat:

Once the denim blue color is dry and any accent design is complete, apply a clear glossy top coat for a polished finish.


what is the nail trend in 2024 ?


4 nail trends to try in 2024 

Don't know what manicure to ask for during your first nail appointment of the year? this is top 4  nail trends to try in 2024

The term "aura nails" typically refers to a type of nail design that features a gradient or ombre effect resembling the colors of an aura. This style often incorporates soft transitions between colors, creating a dreamy and ethereal look on the nails. If you're interested in achieving gradient or aura nails, here's a general guide on how to create this effect:

1 Gradient 'Aura' Nails Tutorial:

Materials:

.Base coat

.Two or more nail polish colors of your choice

.Makeup sponge

.Clear top coat

Steps:

Prepare Your Nails:

Start with clean, trimmed nails. Apply a base coat to protect your natural nails and improve the longevity of the polish.

Choose Your Colors:

Select two or more nail polish colors that complement each other and will create a beautiful gradient effect.

Apply Base Color:

Apply a solid base color to all your nails and allow it to dry completely.

Prepare the Makeup Sponge:

Cut a small piece of a makeup sponge. The sponge will be used to create the gradient effect.

Apply Nail Polish to Sponge:

Apply lines of each chosen nail polish color next to each other on the makeup sponge. Ensure that the colors slightly overlap.

Dab Sponge onto Nails:

Gently press the sponge onto your nail, rolling it slightly to blend the colors. You may need to repeat this step a few times to build up the intensity of the gradient.

Clean Up Edges:

Use a small brush or a cotton swab dipped in nail polish remover to clean up any polish that may have gotten on your skin or cuticles.

Apply Top Coat:

Once you're satisfied with the gradient effect and the polish is dry, apply a clear top coat to seal and protect the design.


2 Metallic Nail Art:

Materials:

Base coat

Metallic nail polish or chrome powder

Sponge applicator (for chrome powder)

UV or LED lamp (for gel-based metallic nails)

Clear top coat

Steps:

Prepare Your Nails:

Start with clean and trimmed nails. Apply a base coat to protect your natural nails.

Apply Metallic Nail Polish:

Apply a metallic nail polish of your choice. For a more intense metallic effect, you can use chrome powder.

Use Chrome Powder (Optional):

If using chrome powder, apply it with a sponge applicator onto the nails while the polish is still tacky. Buff the powder for a shiny, metallic finish.

Cure Under UV/LED Lamp (If Using Gel):

If using a gel-based metallic polish, cure the nails under a UV or LED lamp according to the product's instructions.

Apply Clear Top Coat:

Seal the metallic design with a clear top coat to enhance shine and durability.


If you want to go crazy for "glazed" pastels on your nails, you're in for a trendy and fun manicure. Glazed pastels often refer to soft, muted pastel shades that have a glossy or shiny finish. Here's a guide on how to achieve this look:

 3 Glazed Pastel Nails Tutorial:

Materials:

Base coat

Pastel-colored nail polishes (choose a range of colors)

Clear glossy top coat

Nail art tools (optional)

Steps:

Prepare Your Nails:

Start with clean, trimmed nails. Apply a base coat to protect your natural nails.

Choose Pastel Colors:

Select a range of pastel-colored nail polishes. You can choose shades like mint green, baby blue, lavender, soft pink, or any other pastel hue you love.

Apply Base Color:

Apply one of the pastel colors as a base coat on your nails. Let it dry completely.

Layer Pastel Colors:

Apply additional pastel colors on top of the base color. You can use a different color on each nail or create a gradient effect by applying multiple colors on a single nail. Allow each layer to dry before adding the next.

Add Nail Art (Optional):

Get creative by adding nail art elements like tiny flowers, dots, or geometric patterns using contrasting pastel colors. You can use nail art tools or even toothpicks to create simple designs.

Apply Clear Glossy Top Coat:

Once your pastel colors are dry and you're satisfied with the design, apply a clear glossy top coat. This will give your nails that "glazed" or shiny finish.

Cleanup Edges:

Use a small brush or a cotton swab dipped in nail polish remover to clean up any polish that may have gotten on your skin or cuticles.

Final Touch:

After the top coat has dried, moisturize your cuticles and hands for a polished look.


4 Denim Blue Nails:

Materials:

Base coat

Denim blue nail polish

Silver or white nail polish (for accent if desired)

Clear glossy top coat

Steps:

Prepare Your Nails:

Start with clean, trimmed nails. Apply a base coat to protect your natural nails.

Apply Denim Blue Nail Polish:

Apply a coat of denim blue nail polish on each nail. Allow it to dry completely.

Add Additional Coats (Optional):

If needed, apply a second coat of denim blue nail polish for a richer color. Allow each coat to dry.

Create Accent (Optional):

If you want to add a bit of flair, consider creating an accent nail using silver or white nail polish. You can apply it in a geometric pattern, as dots, or as a French tip.

Apply Clear Glossy Top Coat:

Once the denim blue color is dry and any accent design is complete, apply a clear glossy top coat for a polished finish.